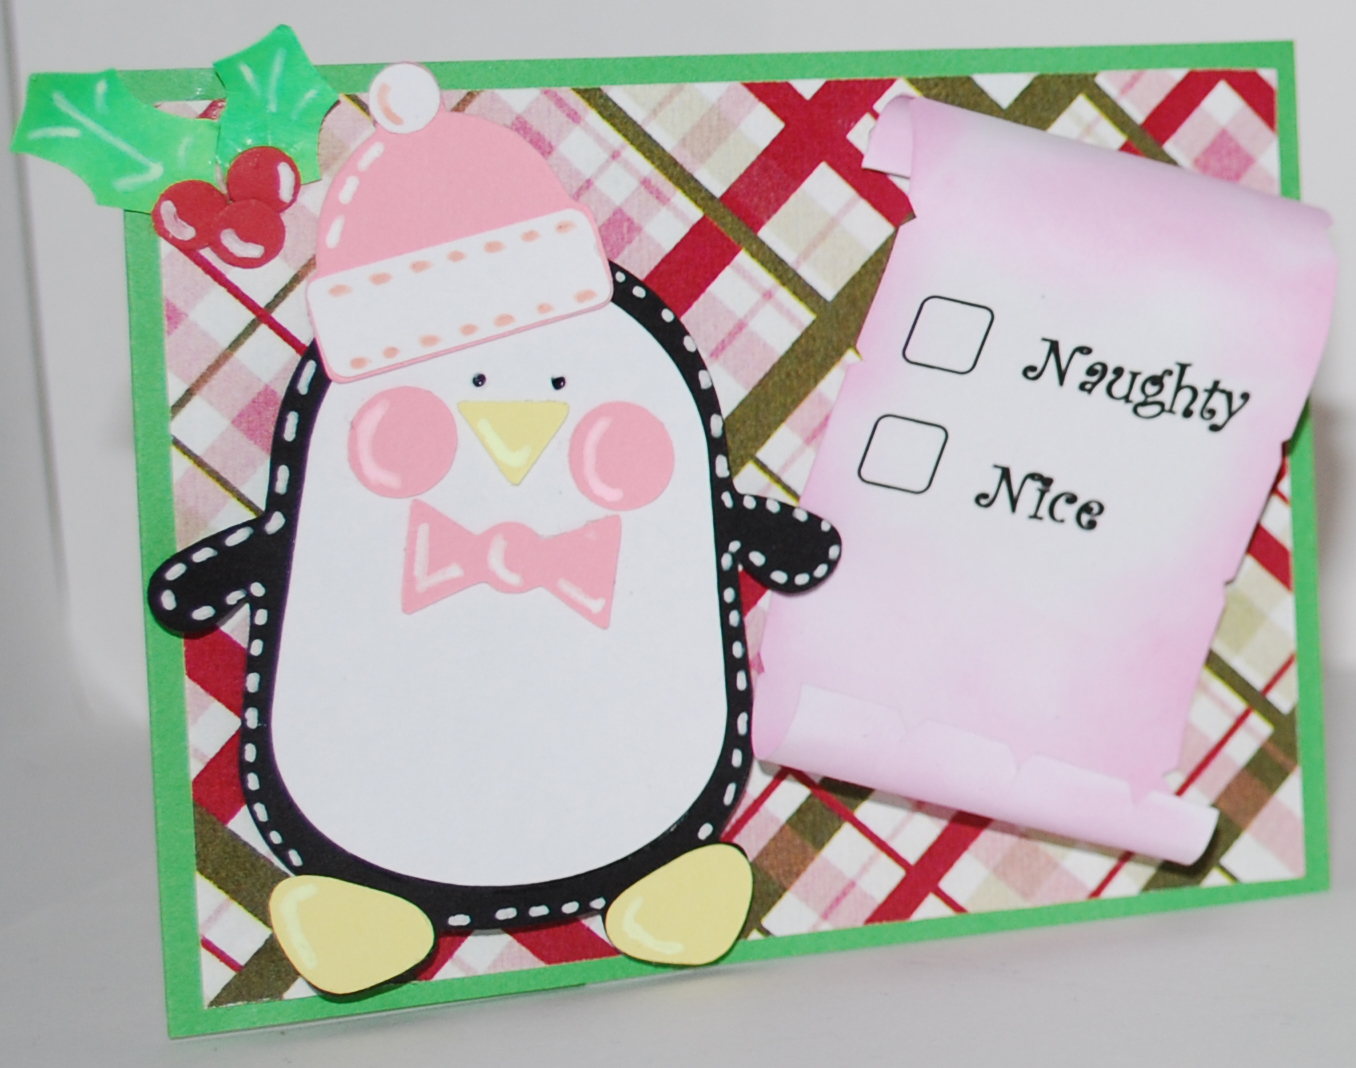
Naughty or Nice Penguin Gift Card
Hello Everyone,
It’s the first week of December and I can’t wait to get started to give out gift cards to friend and family. I thought I pull out my Cricut and create something festive.


Materials:
- Cricut Machine
- Simply Charmed – Cricut Cartridge
- Red, Green, Black, Pink, Yellow, and white Card Stock
- Hole Pump
- Pattern Paper
- White Gel Pen
- Stapler
- Paper Trimmer
- Gift Card
- Pencil
Step 1 – Card Base
Cut your green card stock at 3 7/16 x8 ½, score your card 3 ½ then form your score line score at 4 ½. Fold your card stock by doing so will give you a tri fold card with a little lip. Take your gift card and slip it between the small fold. Take your pencil and make a small mark on the edge of your gift card. Remove your gift card, take your stapler and staple about one centimeter away from your pencil mark.
Step 2 – Decorating your front
Turn your gift card holder over so the back is facing you. You should have a rectangle shape that measures 3 7/16 x 4 ½. Then take your pattern paper leaving a ¼ or 1/8 border, make sure that your staples are covered your pattern paper. Take your red card stock and punch out 3 small circles with your hole punch. Cut two 1×1 green squares, fold them in half and draw leaf pattern. Cut out your leaves and set them aside.
On page 65 of the Simply Charmed Pamphlet I cut the <Hat> on shit at 2 inches, as well as <layer2>. I found the circle where to tiny to put on the hat so I used my hole punch and punched out some white circles. I also cut out the <Penguin1 and 2> on page 66 at 3 ¼ inches. After assembling each penguin I assembled and attached the hats to the penguins.
I then printed out some labels with the words Naughty/Nice with two boxes beside each word. I cut them, rolled them on each end, and cut small triangles along the side. I then used pink ink to give it a used naughty or nice list.
Now bring all your pieces together and position them roughly where you want them. If you see that your staples are poking through your pattern paper. Take your leaves and red circles and position over the staples marks. Add your details with your white gel pen.
Step 3 – Decorating you one 1 ½ inch Flap
Take some coordinating pattern paper and cover your flap leaving a ¼ boarder or enough to cover your staples.
There you go you’re done!